Lehigh Valley Chipotle = OPEN!!!

The day has finally come, Chipotle’s location at the Lehigh Valley Mall in Whitehall, PA is open for business!

If you’ve eaten at a Chipotle before, you’re probably not even still reading and already on your way there, but for those that haven’t, Chipotle offers the very best burritos, tacos, bowls, and salads.

Chipotle strives to serve what they call “food with integrity”, which I’ll use their own words to describe:

“It means serving the very best sustainably raised food possible with an eye to great taste, great nutrition and great value.

It means that we support and sustain family farmers who respect the land and the animals in their care.

It means that whenever possible we use meat from animals raised without the use of antibiotics or added hormones.

And it means that we source organic and local produce when practical. And that we use dairy from cows raised without the use of synthetic hormones.

Food With Integrity is a journey that started more than a decade ago and one that will never end.”

I appreciate/respect all that, but what I care about most is that their food is DELICIOUS/FAST/REASONABLY PRICED.  If you live in the Lehigh Valley, stop reading and start eating:

Chipotle Mexican Grill
837 Lehigh Lifestyle Center
Whitehall, PA 18052

Phone     610.465.9526
Fax     610.264.2560

Open:  Mon-Sun  11am-10pm

You can even order online.

I went around noon today, and the line was approx. 10 minutes long.  They’ve got seating for around 30 people inside with more seating outside.  And yes, it was delicious :)

Cheap LCD Humidity/Hygrometer and Thermometer Mod’d To Show Fahrenheit

I bought 2 of  these little digital gems from DealExtreme for $5.90/ea to keep an eye on temp and humidity in my house, basement, and root cellar.

Several reviews clearly said it only displays Celsius and is not mod’able to display Fahrenheit, but I do enjoy a challenge.  Especially  a challenge where something is dirt cheap :)

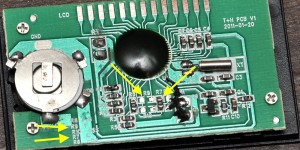
The unit arrives pre-assembled from DealExtreme.  You need only open the battery cover, remove the insulator from the battery and it powers right up.  There are indeed no buttons or controls at all, but there’s (4) tiny screws holding it together.  If you remove these (4) screws, carefully pull the LCD off the board (it’s kind of “stuck” on there), and then remove the little black foam piece, you’ll see this:

[Click the image to see the full-size]

Follow my arrows and you see R7 is labeled “C” and R9 “F”.   The resistor on R7 is marked “0″, meaning zero ohms.  It’s just connecting those two solder dots, that’s it.  I carefully pried that off with a utility knife, and soldered a tiny copper wire between the two dots on R9.

Bam!  Fahrenheit instead of Celsius :)

Note: When you put it back together, be careful to line up the LCD with the PCB so that when you apply pressure the display is complete/correct.  Once lined up, re-assemble with the (4) screws.  The pressure of the case is what keeps the LCD pressing on that PCB to maintain the display.

The Return of Steam

Ok, time for me to crawl out of my hole and post something.  I’ve been really busy doing some pretty major work on a new house, but this story caught my eye:

The future of rail could be this 75 year old steam locomotive

http://dvice.com/archives/2012/05/the-future-of-r-1.php

Ever since I was a small boy, I’ve loved steam engines.  While diesel engines sound like an off balance washing machine on spin cycle, steam engines huff, puff, chug, and drip with industrial sexiness.

Steam engines were historically powered by burning dirty coal, and lots of it, but The University of Minnesota and Sustainable Rail International plan on modernizing and converting old No. 3463 from the Sante Fe Railroad to burn biocoal.  Unlike regular coal, biocoal is clean-burning and carbon neutral.

I really hope these guys make a dent in bringing back steam.  When I was younger, growing up in the northeast, you could go 25 miles in any direction and find steam exhibition rides or even tourist railroads running steam, but nowadays finding a running steam engine is next to impossible.  The generation of folks that worked the railroads when these beasts ran freight and passenger service is almost gone, and younger generations just don’t care to get involved.  This could change that.

I rode the Reading 2102 when she ran exhibitions in the early 90’s in Pennsylvania.  If you’ve never seen a running steam engine, here’s video I shot with my dad’s camcorder wayyyy back in 1991:

Yeh, I’m addicted.

Back my friend Tom: “The World in a Bubble Project”

Follow this link to the KICKSTARTER campaign:

http://www.kickstarter.com/projects/1507789251/the-world-in-a-bubble-project

SpamAssassin: Whitelist your friends!

SpamAssassin is an invaluable tool for keeping spam out of your Inbox, but let’s face it, sometimes our friends look like spammers too.

Whether they forward junk mail with a real message on top that you *do* want to read, or if their outlook “stationary” screams of vintage blinking 1995ish internet, there’s two ways to solve this:

1) Get new friends

2) Whitelist them

Since canceling our friendships isn’t generally a good life-move, let’s whitelist them in SpamAssassin.

The first step is locating and opening your user prefs or configuration file.  If you’re the server administrator, and want the whitelist entries to be global, you’ll want to edit:

/etc/mail/spamassassin/local.cf

To edit the prefs for just a single user, you’ll want to look here:

~/.spamassassin/user_prefs

For each sender you want to to whitelist, add the following entry into the config or prefs file:

whitelist_from  user@domain.com

You can also whitelist every sender from an entire domain with the following entry:

whitelist_from  *@domain.com

For even more information and options, checkout the SpamAssassin doc page for whitelisting:

http://wiki.apache.org/spamassassin/ManualWhitelist

MapQuest: Free talking turn-by-turn directions for your iPhone

If you’re an iPhone user with friends on Android devices, you’ve probably seen their super-slick google maps with turn-by-turn directions.  Since the google maps app on iPhone will probably *NEVER* get updated to work the same as it does on android for obvious reasons, you have to look elsewhere for turn-by-turn directions.

I’ve gone down this road in the past, and not found anything free worth using in the app store, but that changed recently.

Remember MapQuest?. .  . you know, that site you went to for directions online before google maps existed?  Well, MapQuest has an iPhone app out called “MapQuest 4 Mobile”.  It’s 100% free, gives turn-by-turn directions both on screen and via voice, and recalculates when you miss a turn.

I tried it on my way home a few days ago, and it worked perfectly.  It *does* like to eat the battery, as any GPS app does.  I left work with ~45% battery, and got home with ~30%.   My drive is 35 miles and usually takes just under an hour, so 15% loss isn’t terrible I suppose.

If you have an iPhone, I strongly suggest you give it a try.

Get it here:

http://itunes.apple.com/us/app/mapquest-4-mobile/id316126557?mt=8&ls=1

Build your own 10TB SAN for less than $800

I’ve been upgrading my storage every 2 years or so for at least the last 10 years, and it was time to get serious.

The last two upgrades I made were 2 x 1TB drives in a RAID1, and then up to 2 x 2TB drives in a RAID1.  Both configurations were attached to a mid-level RAID card and offered “ok” performance and “ok” redundancy, since it was a simple RAID1.

Enter, “The problem”:  In addition to growing my storage needs quicker, largely around the fact that my wife and I were downloading a lot of HD TV content, I also started leveraging  VMware a lot more, and disk I/O was becoming a real bottleneck on the pair of 320GB drives I had running in that box (another simple RAID1).  It was only a year since I had moved up to 2 x 2TB HD’s and 3TB HD’s would have barely been a band-aid.

My goal was to solve both problems with 1 solution:

Build a SAN that provided higher I/O capabilities than the current local storage in my VMware box, AND provide bulk storage for the increasing amount of videos we download, pictures we take, music we collect, etc.

I had heard about ZFS years ago, but when I dug deeper, it seemed like it wasn’t ready for prime-time.  Well, things have changed.  ZFS is becoming widely used at the enterprise level and considered stable for production.  ZFS works similarly to how a basic RAID controller functions, but uses a whole x86 computer to act as the controller with ZFS acting like the “firmware” running on the controller.  ZFS offers data integrity verification against data corruption modes, support for high storage capacities, snapshots, copy-on-write clones, continuous integrity checking with automatic repair, and iSCSI through COMSTAR at the OS level.

ZFS running on a moderately priced x86 box will far outperform high-end RAID cards that alone cost more than this whole build.  Since ZFS does the “work” you previously counted on the RAID card for, you DON’T NEED high-end RAID cards to attach your drives to in a ZFS box.  You do want “fast” HBA’s, but they’re still cheap. especially if you’re willing to buy used, since these simple HBA’s are what typically ships with base-model servers and are typically “pulled” and sold on eBay.  The HBA in my recipe below is an LSI1068E with a Dell part #.  Several vendors make HBA’s with this chip, so if you can’t readily find the dell part, try looking for cards branded under Lenovo or HP.

Now, the recipe:
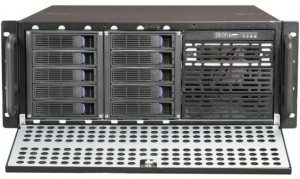
1x NORCO 10-bay Hot Swap Server Chassis = $240

http://www.newegg.com/Product/Product.aspx?Item=N82E16811219037
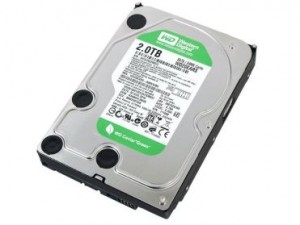
6x Western Digital WD20EARS 2TB SATA HD’s = $540

http://www.newegg.com/Product/Product.aspx?Item=N82E16822136514

2x 1M SAS 32-pin to 4 SATA = $40

http://www.provantage.com/cables-go-10249~7CBT9212.htm
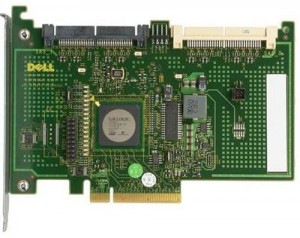
1x LSI 1068E PCIe SATA/SAS Controller = $19 on eBay

http://accessories.dell.com/sna/products/Hard_Drives_Storage/productdetail.aspx?c=ca&l=en&s=biz&cs=calca1&sku=313-8239

Oracle Solaris Express 11 = FREE

http://www.oracle.com/technetwork/server-storage/solaris11/downloads/index.html

TOTAL = $799

This build does expect you have some general experience with storage, x86 PC’s, and a few parts laying around you can re-use.  You’ll notice the above recipe doesn’t include the mobo, cpu, mem, or power supply.  These are all things I had laying around from other builds, and it doesn’t have to be fancy.  Anything dual-core with at least 2GB of mem and a PCIe slot that works with storage adapters will be just fine.  MOST motherboards will work with an HBA in their PCIe slot, but it’s a good idea to do a few google searches before you pull the trigger on a purchase to see if anyone else has tried with that specific board.  I used a Gigabyte mobo and had no issues.  You will want to make sure the power supply you use has enough umphh to power the system and all the drives.  I had a  550w of good quality in my parts pile and used that.

If you don’t have any of the above items, figure another $200-$250 for the build. . which still only puts the total at around $1,000.  If you’re buying a new mobo and cpu, buy something low power.  The difference between a dual core i3 and a quad core i7 will be very little.  Spend your money on memory instead, which will make a far greater impact on performance than raw CPU speed.  The memory in your home-built SAN is used similarly to how the cache would function on a classic RAID card.  The more you have, the faster it goes.

If you plan on building a SAN similar to the one above with ~6 drives, you’ll be fine with a single HBA and the cable linked above.  In addition to the drives you’ll use for your storage, you’ll want a drive or two for the OS.  One drive is all that’s needed, but if you have two laying around, it’s a good idea to have redundancy for Solaris Express, since if the OS goes down, your data will be inaccessible until you reload Solaris on a fresh drive and remount your data pools.

So, build your rig, install Solaris Express (instructions available at the same site linked above for download), and make sure Solaris can “see” all of the hardware in your box.  The next step is configuration.  I opted for configuring via a GUI, but ZFS does have a full-featured command line implementation.  The GUI I used is napp-it, available here (for free):

http://www.napp-it.org/downloads/index_en.html

You can actually install it as easily as running the below one-liner from a root shell on your SAN:

wget -O – www.napp-it.org/nappit | perl

napp-it is basically a simple web app that interfaces with ZFS underneath,  but presents a nice GUI in your browser for building and managing storage pools and their accessability.  There’s LOTS of different ways you can build a storage pool or pools with the 6 drives suggested above, but I would suggest a RAID-Z2.  This works similarly to the classic RAID-6, in that you can lose up to two drives without losing any data.  I won’t go into the other pool types  and/or their merits here, but the ZFS wikipedia page has tons of info:

http://en.wikipedia.org/wiki/ZFS

A 6 disk RAID-Z2 built from 2TB drives will yield about 7.1 terabytes of usable space after formatting.   The same 6 disks in a RAID-Z1 would yield ~9 terabytes formatted, and a simple volume with no redundancy would yield over 10 terabytes.   The reward of up to 30% more usable space is NOT worth the risk of  a single disk failure wiping out all your data.  I would strongly suggest the RAID-Z2 option.

Go build!

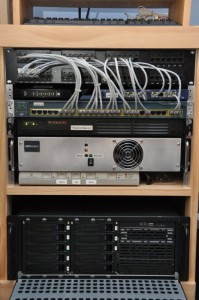
Here’s my home network rack with the completed SAN on the bottom shelf:
click the pic for full-size view

NOTE:  The price for the 2TB drives linked above was $89.99/ea when I put this article together.  With the flooding in Thailand, the prices for all drives skyrocketed, but is starting to settle down again.  If you’re not in a hurry, wait until the price stabilizes.  It  *will* come back down to the $89.99 price point, if it hasn’t already by the time you’re reading this :)

Proof Siri hates my wife!

If that isn’t proof enough, watch the next one!

I sware, this is legit. I have no idea what got into Siri tonight. She must be repeating stuff from past searches. . . .I mean. . not that I ever searched for strip clubs :P

PS, that’s my wife snoring in the background :)

DIY: Wooden Tie Rack

Recently I’ve had to start wearing ties to work, and the two total ties I previously owned just wasn’t cutting it.  I harvested the ties my father used to wear, which rounded out my tie selection quite acceptably.  Unfortunately, I quickly realized that while having two ties in your sock drawer works just fine, having fifteen in there doesn’t.

I headed out to my trusty local Wal-Mart to pick up a tie rack, but alas, they had none!  Mind you, they weren’t out of them, they simply didn’t carry them.  Sure, I could have ordered one online, but that meant waiting, and patient I am not.  So, I bought a few vertical wooden hangers that came with hooks meant for belts and headed home.

At home, I pulled out the hooks from the vertical wooden hangers with locking pliers and made a simple plan to build my own rack:

The tie rack is 22″ wide, and 4.5″ tall, a good size to screw to the inside of most closet doors.

I made mine out of 3/4″ pine and sanded a nice round-over onto the edges.  I marked everything with my 1:1 paper template, and drilled out the holes for hooks.  I pounded the scavenged hooks into the holes with a mallet.  You could just as easily makes the hooks from wooden dowels or cut lengths of aluminum rod.

I’m pretty happy with the result, and thought I’d share the plans.

Below is a PDF of the tie rack plans.  It prints onto 3 sheets and each page overlaps the next by 2″.   Make sure your printer is NOT set to shrink to fit, or it won’t be the full 22″ when you cut and tape it together.

Tie Rack Plans – 1:1 PDF Template

Enjoy!