Archive for the ‘Uncategorized’ Category

How to transfer pictures and video from your iPhone to Windows without it failing 100% of the time

I’m writing this post today because it’s unimaginable that to me in 2019 you can’t just plug a device as common as an iPhone into a device as common as a PC running windows and expect to transfer your pics and vids successfully. It has LITERALLY been years since I’ve tried to do this and had it work on the first try. Usually it takes dozens of tries, and ultimately results in me frustratingly deleting a bunch of pictures and videos until it can complete successfully. I remember using a digital camera in 1996 that was easier to get pictures off than this! Insanity!

Today, is an exception. I REALLY needed a group of videos I’ve taken on my iPhone X transferred to my PC for editing, and now, after THREE HOURS of failed attempts, I have found the holy grail secret trick. Apparently, by default Apple thought it would be smart to try and have their iOS devices do some sort of automatic voodoo where it converts media types on the fly to be more native to the device it’s transferring them to. Problem is, they must have only tested it on a pic of a bagel in the break room, and a 5 second video. It chokes on media created right on your iOS device all the time. Forgot about 3-rd party pics or vids you may have saved to your local camera roll. If you did that, you’re 100% guaranteed to fail. Windows 7, Windows 10, doesn’t matter. iPhone 6, iPhone 7, iPhone 8, iPhone X series. . all fail with a message like “a device attached to the system stopped responding”, or it just gets stuck. Unplug it, plug it back in and it doesn’t even show up. That’s par for the course. Ok, I’m done ranting, here’s the solution:

On your iOS device, goto ‘Settings’ -> ‘Photos’ -> ‘Transfer to MAC or PC’ and select “Keep Originals”.

That’s it. It’s that easy. It even speeds up the transfer, SIGNIFICANTLY.

Enjoy having all your pics and vids on the FIRST try. Do note though that since it’s now NOT converting media on transfer, the file types might be different than what you expect. For example, you get HEIC files instead of JPG’s. Read more info on HEIC files here if that’s a new thing to you.

2018/2019 Dual Sport Maintenance Interval Comparison

Link to the actual spreadsheet:

Dual Sport Bike Maintenance Interval Comparison

CRF450L Ride Review: Coming from a WR250R


New bike time!

24-Channel Raspberry Pi Fireworks Control System

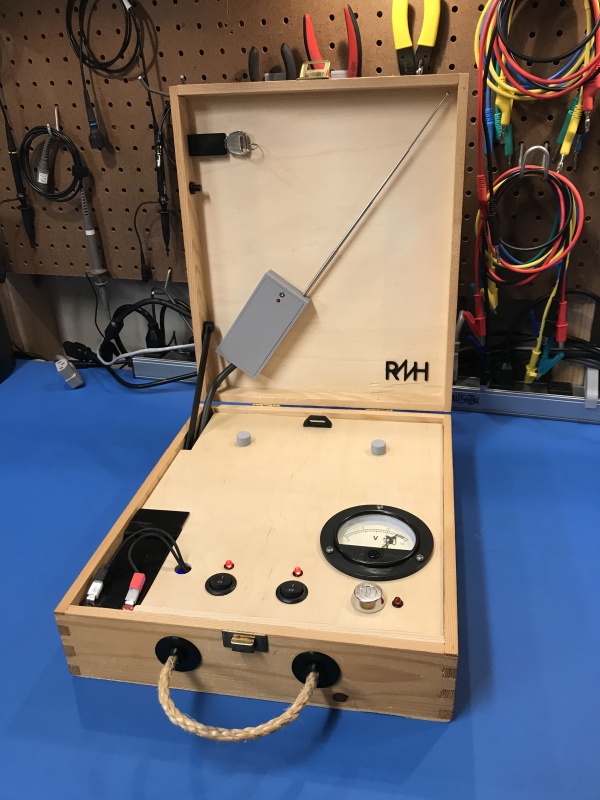
Every year I do a modest fireworks show for our 4th of July Party.  It’s canister mortars, bricks, mines, spinners, etc.  Every year I end up spending the whole time either messing with buttons for the stuff I’ve e-matched, and/or fiddling with fuses. I never get to ’see” the show, and it’s never timed in the way to deliver the most impact.  This year, I decided it was time to automate the show so I could enjoy it as well.   As such, the Mark I ‘KaBoom’ fireworks controller was born.

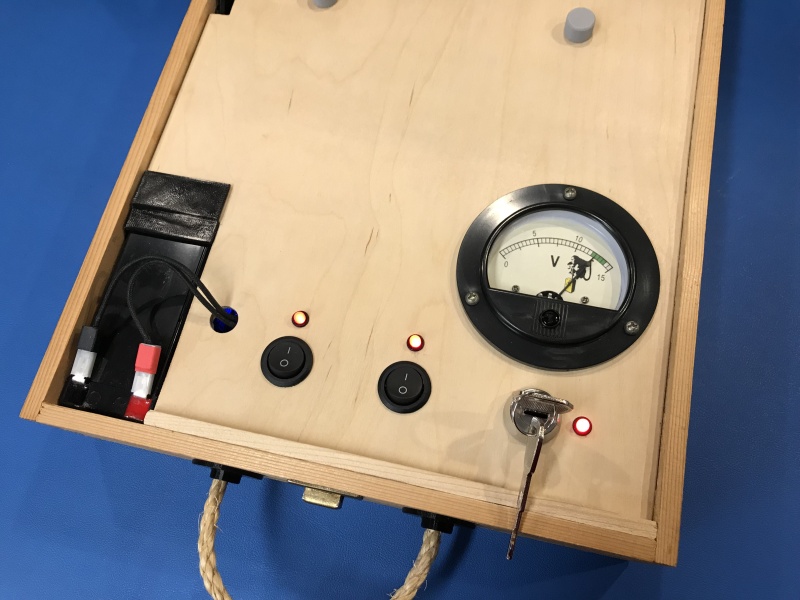
I decided 24 channels was enough for me (that’s about the total number of fireworks we launch each year), but you could easily modify this basic design to accommodate at least 36 channels with 1 more relay and a 2nd 12-channel wireless unit (more on that later).  Features of the Mark I ‘KaBoom’ include: 12 Wired Control Channels, 12 Wireless Control Channels, Wi-Fi web-page control from your phone or tablet (no internet connection required), Individual Live Manual Channel Control for fire/on/off, Keyed Arming Protection (won’t fire without the key in and turned), 100% Self-Powered, Script-able control (schedule delays and order of firing by writing basic shell scripts, controllable from the Wi-Fi web interface).

Here’s the exact actual parts I used to build the fireworks controller:

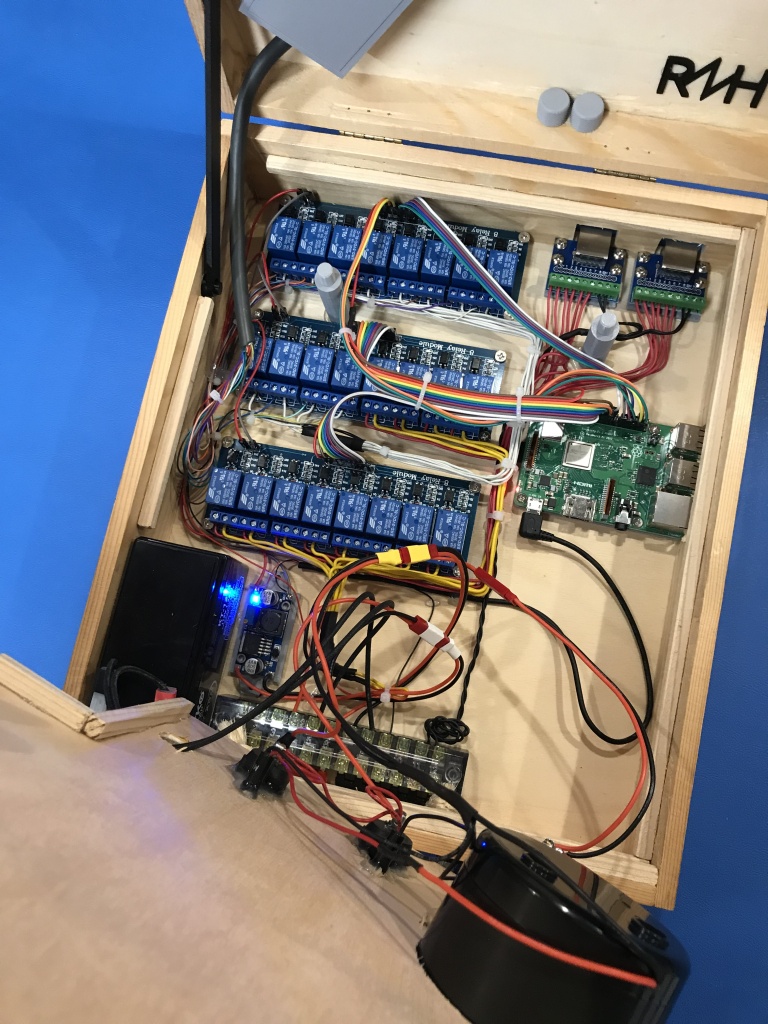
(3) 8-Channel Relay Modules

(1) DC-DC Regulated Power Buck

(1) Raspberry Pi3 B+

(1) 1.2Ah 12v SLA Battery

(2) SPST Round Rocker Switches

(1) Key Switch

(1) Micro-USB Cable

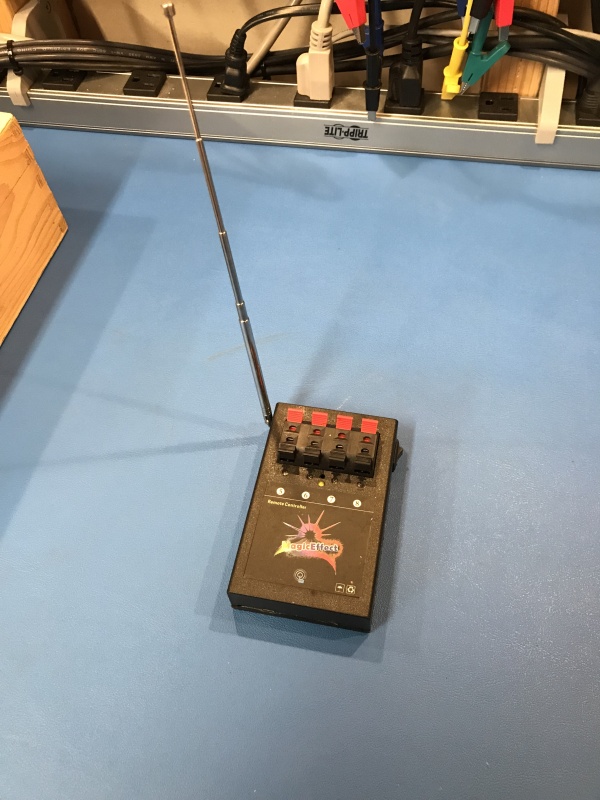
(1) Generic 12-ch Wireless Fireworks TX w/RX units

(2) RJ-45 Break-Outs

(1) 80-Piece Breadboard Wire Assortment

(1) Analog Panel Voltmeter

(3) 12-position terminal blocks

You’ll also need some kind of box to put your project in, and some assorted small pieces of wood. I used an old wine box I found with 3-D printed parts and a hot glue gun to hold most things together.

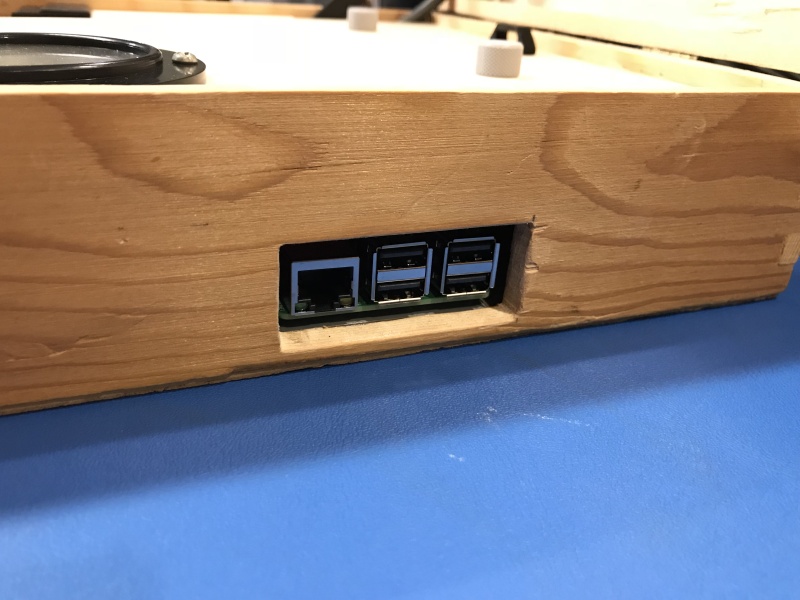
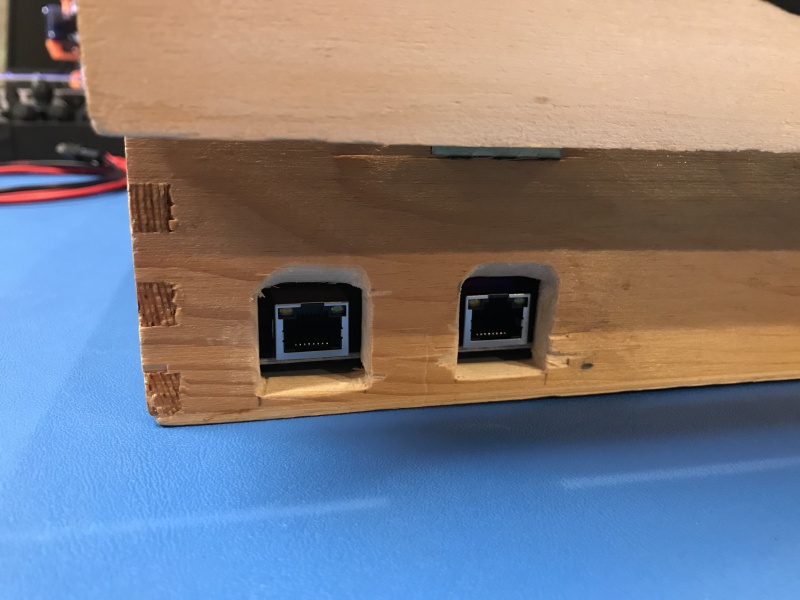
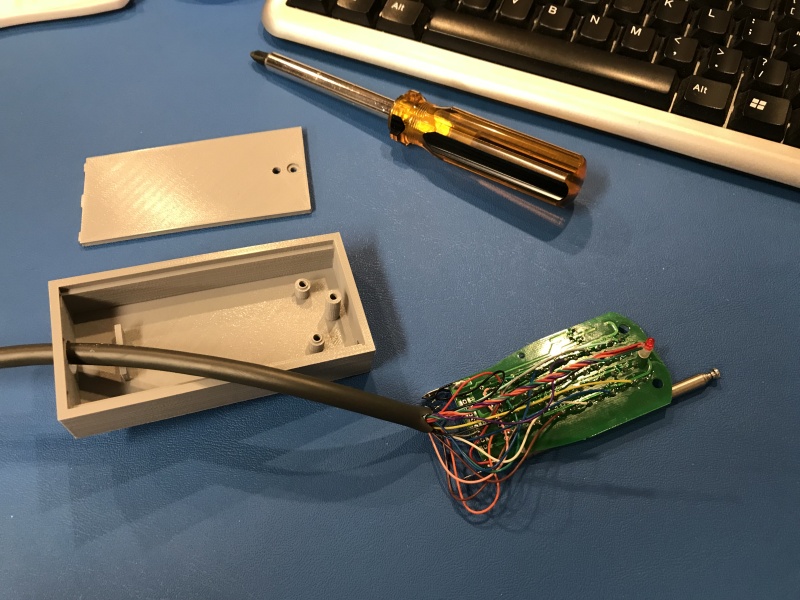
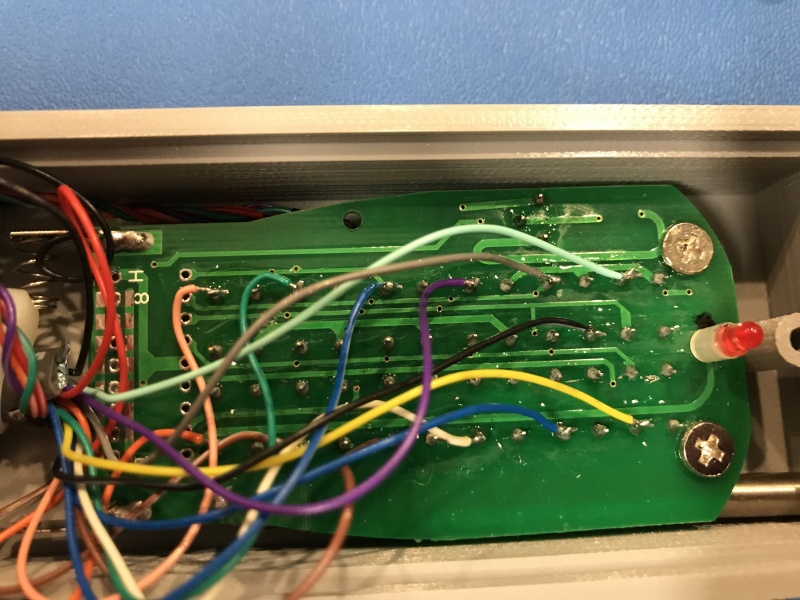
In short, here’s the theory of operation,  There’s 26 usable GPIO’s on the Pi3 B+.  24 of them are wired to the 24 relays.  12 of those relays, when thrown, send 12v to the wired RJ45’s on the back (6 channels per jack).  This directly triggers the e-matches to ignite the fireworks.  The other 12 relays control the 12 wireless firing buttons on the remote that comes with the generic 12-channel fireworks controller.  To do this, those relays short a shared ground pin to the ‘on’ pin of each push button switch (see the pics below to see the wiring).  I used an old parallel printer cable for the necessary wires, but anything would work.  You need 15 wires in total for the fireworks remote.  2 for 12-volt power (supplied only when the arming key is on, 1 for the shared ground, and 12 for the button pins.

To configure the Pi’s Wi-Fi for local access, I followed this great guide at the Raspberry Pi Website:

https://www.raspberrypi.org/documentation/configuration/wireless/access-point.md

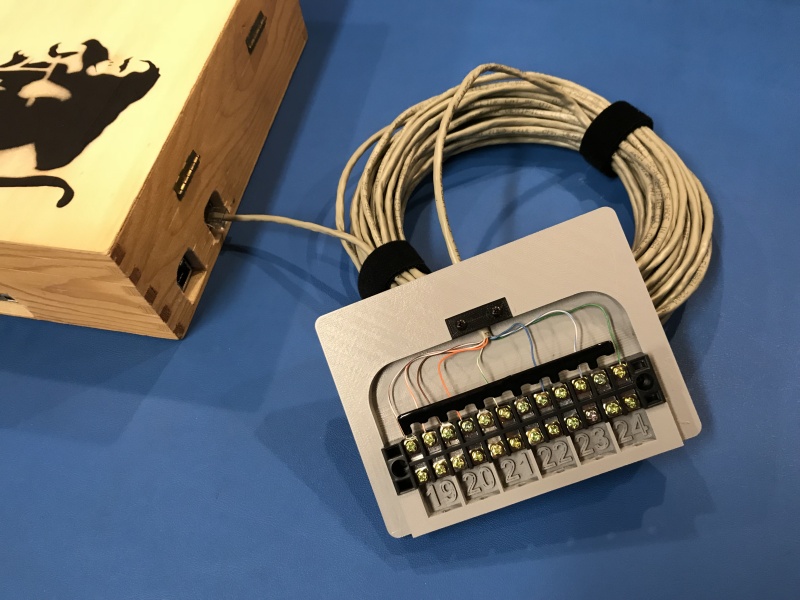
I used the Pi’s wired RJ-45 connection for the test/dev work.  All of the control software uses standard python libs for the GPIO pin control to drive the relays, and basic bash scripts running as CGI in Apache.  Boards were all mounted using custom 3-D printed stand-offs, and I made a ton of custom 3-D printed parts for things like the handle feed-thru’s, lid prop, control cover stand-offs with threaded caps, battery hold-down, etc.  This stuff could all be skipped or accomplished with basic tools, some wood scraps,  and more hot glue, but I was going for a certain look and finished quality.  Actual interface to the fireworks e-matches is the terminal blocks at the end of 60′ lengths of solid-copper cat5e.

Want another 12 channels?  It occurred to me after the initial design that you could add another 12-channel RX/TX set, wired to the same 12 relays you used for the first wireless remote and add 1 more relay to control which remote (TX) gets 12v power when the channel is fired as sort of a ’shift register’.

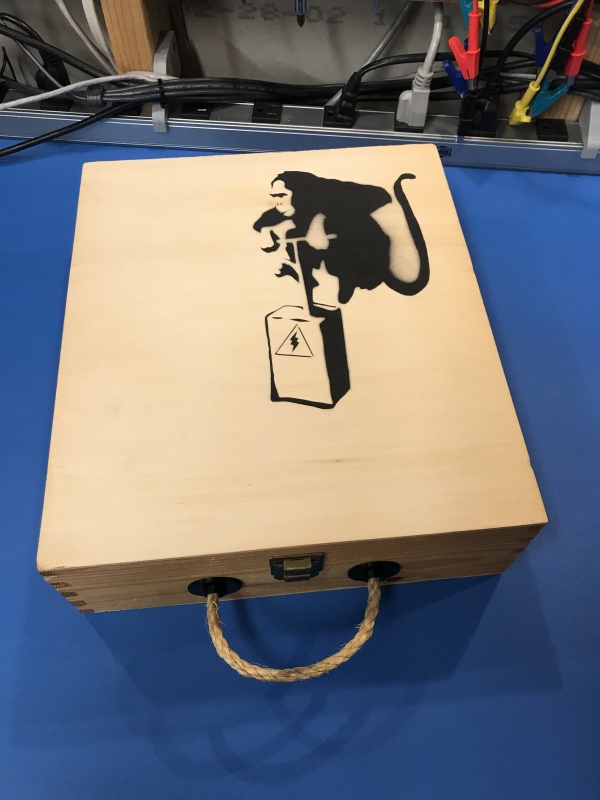
Credit for the stenciled artwork on the box and the graphic in the web/app goes to Banksy.  Hopefully he doesn’t mind me using his imagery :)

Overall, I am really happy with how this project turned out.  It cost less than half what a scriptable 24-channel unit (with the necessary RX/TX modules) would cost, and was a bunch of fun to design and build.  Even had my 9-yr old interested through the process.  She was checking in each time I worked on it to see what was new/working.

I’ll post up a video of the full show when it happens this 4th of July, but here’s 3 test shots, timed a half-second apart from left to right:

https://www.youtube.com/watch?v=xHI18-IAhEE (taken from DJI Mavic drone)

More pics below, and full size images available on my gallery page:

—–< EDIT >—–

Here’s the video of our show from this 4th of July!:

https://youtu.be/OuWJh7eaRwo

Pro Tip – Subaru BRZ, Scion FR-S, Toyota 86 Jumper Cable Storage

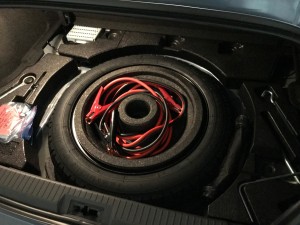
Picture says it all!

I bought a set of these and an air pump for all our vehicles years ago.  Originally I just had them on the trunk floor, but this sucks for two reasons:

1) They slide around when I slide the car around.

2) They’re often in the way

A third advantage is you’re lowing your center of gravity, just a teency bit :)   Hard to tell from the pic, but the trunk floor sits 100% flush with these in here, and I never hear them moving/rattling.  They basically fit perfect.

Need a set?  These are the exact ones I purchased:

https://amzn.to/2rQk6kr

Not having a set of cables and needing a jump is a stupid reason to have to call for a tow or help.

Anet A8 – Official Mod Survival Guide – Part 1

The Anet A8 takes a lot of heat on the popular 3-D printing waterholes for some well-known issues, but the reality is that you’re getting quite a bit for your hard-earned dollars, and those well-known issues are easy to fix/mod.

Yes, there’s other options out there, like the Maker Select Mini, or the Wanhao Duplicator i3 V2, but all told, you’ll spend less overall on the A8 + mods, AND have a better working printer than the popular competitors after the mods are completed.

First, some basics.  The A8 is an FDM printer with a build size of 220 x 220 x 240.  This is a pretty generous build size for this price category, and will cover most needs.  The A8 will print PLA or ABS, as well as some other exotics given the cooled extruder and heated bed.   Personally, I stick with PLA since there’s no odor or health risks.  ABS is better for printed items used in applications where heat is a concern, but it’s tougher to print with, and off-gasses lots of harmful nasty stuff during printing.

The A8’s key weaknesses are inadequate high-current connections, a flexy frame, and loose-fitting mechanical components.  I think the latter was actually intentional to make them easy to assembly.  Speaking of assembly, do not be afraid to buy this printer as a kit.  I had zero experience in 3D printing prior to a few months ago, but jumped in head-first with the A8 in kit form.  By building yourself, you learn how all the components work and fit together, making maintenance and tuning much less of a mystery.  Only the most basic tools are required, and they’re included with the printer.

Mod #1 – Cost: $11.97 – Blue painter’s tape for the build platform

I guess this one isn’t really a mod, since the printer does ship from the factory with a form of painter’s tape on the bed, but this is the stuff you want to replace that with when the factory stuff wears out.  I generally get ~5-10 prints on a layer of painter’s tape before I replace it, so a 60-yard roll will go a long way.  The 2.83 wide stuff from 3M only requires 3-rows to cover the whole build plate, and avoids a seam in the center of the bed.  As such, small prints have no seam underneath.  Painter’s tape gives you a nice matte lightly-textured finish on the bottom of printed parts.  Some folks prefer printing on borosilicate glass for the glossy finish, but glass comes with it’s own challenges, and in my opinion, tape is just easier to work with, and I actually like the lightly textured matte finish.

Mod #2 – Cost: $5.83 – Shimming your linear motion rods (more tape)

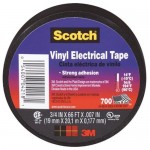
For ease of installation, the vertical linear motion rods (the smooth vertical rods) on the A8 are loose fitting.  Unfortunately, they’re a bit *too* loose fitting.  If you grab one of the vertical linear motion rods at the bottom, just above one of the z-axis steppers, you can shift it around approx. .5mm in any direction.  That might not sound like a lot, but a layer shift when printing of even 1/5th of that is easily perceptible, and these certainly *do* shift around when printing. especially if the nozzle encounters any resistance when hopping from section to section on a print.  I’ve seen folks drill holes in the frame plates and add grub screws, but honestly, this is overkill, and you risk cracking your frame.  The most simple fix is to just trim some vinyl electrical tape to about 1/4″wide and ~3/4″ long and just wrap it around the very ends of the rods top and bottom.  So this *after* the rods are inserted, and the x-axis idlers are in place.  I’ll pull the bottom rod out just enough to clear the hole, wrap it with one wrap of tape, and then twist it back into the bottom hole.  For the top, I’ll just pop off the whole top plate for that side (only two screws), and the single wrap of tape, and then fit the top plate back over the rod.  You’ll need to do this each time you take  the printer apart in the future, which is why I suggest using the good quality scotch vinyl tape.  It comes off cleanly, and doesn’t turn into a pile of sticky goo.

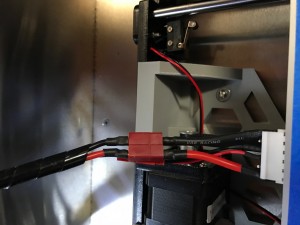
Mod #3 – Cost: $~35.00 – Install MOSFET’s and better power connectors

The power control circuits in the A8 from the factory are weak, as are many of the connectors.  I’ve already got a write-up on adding MOSFET’s to the A8, but to that, I’d add that you should also replace the connector to the heatbed.   I soldered leads directly to the pins on the heatbed, and placed a deans-style connector an inch or so back.  I also replaced the heatbed wiring with nice soft silicone-jacketed wire to handle the flex when the heatbed moves back and forth.  If you’re not a fan of the dean’s style connectors, XT-60 are another good choice, and a bit easier to solder.   I used JST connectors to maintain a quick-disconnect for the thermistor leads as well.

Stay tuned for Part 2 coming soon!

Winner – Title says it all!

http://www.collegehumor.com/video:1938370

iPhone 4 order madness!

I may or may not be receiving an iPhone 4 on the 24th.  I honestly have no idea, and I’m in the same boat with about 3/4 of a million other people.

Here’s how things went down:

June 14th, 10:00pm – Considered staying up till midnight to put in the pre-order, but couldn’t find any confirmation it would even be available that early, and I was on vacation in Florida, so I figured the hell with it, I’d get up early and try the pre-order as soon as possible.

June 15th, 7:30am – Woke up and started my pre-order on AT&T’s website.  Site was responding a little “slow” but seemed to be working “OK”.

June 15th, 7:45am – Got to the final checkout page, had my credit card info in, etc. and hit “Checkout”

June 15th, 7:55am – AFTER A PAINFUL TEN MINUTES, the checkout page fails with a proxy timeout error and a long numerical string.  I check my bank account, and there’s a $1.00 auth from AT&T, so I figured it probably went through and just never spit back a confirmation.  We were on vacation and I had other stuff to do, so I quit worrying about it and went about breakfast and planning the day.

June 15th, 10:00am – After reading reports of widespread complete failures in the ordering process at both AT&T and Apple, I figured I better give customer service a call and see if they have my order.

June 15th, 10:15am – After waiting on hold for 15 minutes, I finally get on with a rep who tells me there’s no order on my account, and the system is completely overwhelmed with orders.  I request she process an order for me, but she states she doesn’t even have the ability to do so.  When I ask what I should do, she states I should “just keep trying”, and suggests I give Apple’s site a try as well.

June 15th, 10:30am – Upon trying to order again at AT&T’s site, it won’t even let me proceed past the upgrade screen.  Immediately kicks back an error page and tells me for non-iPhone upgrades I can contact customer service.   I later learned AT&T had actually started blocking upgrades while they tried to make sense of what was going on, but their reps never stopped telling people to “keep trying”.  Assholes.

June 15th, 10:45am – I try ordering at Apple’s site.  The site is slow as molasses, and fails repeatedly never reaching all the way through to the part where I can actually order.

June 15th, 11:30am – I throw my hands up in the air and give up, frustrated I’d sunk that much time in trying to give a co. money for something that doesn’t even exist yet.  It’s one thing to fight for a credit or a correction in service.  It’s another to have to FIGHT to give a company money.  How dare I.

June 15th, 2:00pm – My wife, bless her soul, decides to give it a try and repeatedly attempts ordering through AT&T website, Apple’s website, and the iPhone Apple Store App after reading reports of occasional “successes” reported on twitter, etc.   I head out to pickup lunch wanting nothing to do with it at this point.

June 15th, 3:00pm – After a FULL HOUR of trying, she succeeds!  AT&T’s site comes through with an order confirmation, which she wisely “saves” since we had no printer available to us on vacation.  At this point I’m cautiously happy, but did breathe a sigh of relief.

June 16th, 1:00pm – I receive an email from AT&T stating my order has been canceled, claiming: “Unfortunately, we were either unable to verify the information you provided or you have exceeded the number of lines of service that we allow customers to purchase online. As a result, your order has been canceled.”  I was so angry, I didn’t even do anything right away.  The reality that I wasn’t likely getting a phone until mid to late July set in, and I gulped it down like a 10lb rock with jagged edges.

June 16th, 5:00pm – Again, my wife saves the day by calling AT&T and finds out there were “multiple orders” and they show that while one was canceled, a second one “appears” to be “in process”.

June 16th, 9:40pm – I get a second email from AT&T claiming that my iPhone 4 pre-order has been received and is being processed in the order it was received.  It includes an order #, and I plug it into AT&T’s site under order status, it simply shows “in-process”, but with an order date of the 16th.

Fast forward to today, my order still shows “in process” with an order date of the 16th, and several calls to AT&T have yielded no answer as to when my phone will ship.  Reports from various sources online state orders received before late afternoon on the 15th SHOULD ship for delivery on the 24th, and my order was definetely placed in that range, but nevertheless the date states the 16th.

I guess at this point, I wait until the 23rd and see if the order shows as “shipped”, and if it doesn’t the most I can do is call AT&T and complain.  Never in my life have I gone through such a bullshit ordeal to buy something, let alone on a pre-order.  From what I understand AT&T and Apple have together accepted over 3/4 million pre-orders with the first 600k occuring on the 15th alone!  While this is a record-setting number, the process was still completely unacceptable and has likely left each and every one of the 600k people that did succeed in getting an order through pissed at AT&T for not stepping up to the plate with a queuing system, or a slimmed down process for completing checkout at any time throughout the day.

So tell me, did you get an order through?  If so, what’s your order date, and have you gotten a delivery estimate from AT&T?

UPDATE:

June 19th, 3:30pm – Spoke with another rep from AT&T, and was told that due to the overwhelming response, NO orders are expected to ship for delivery before the 26th (and more likely the 28th).  This was from a single source at AT&T, and I don’t see anyone else reporting it, but she insisted nothing would be shipping for delivery on the 24th.  I guess we’ll see :)

UPDATE:

June 21st, 10:00am – Received a voicemail from AT&T stating my order “should” ship for delivery between the 25th and 28th of June.